Inspection – Stallion Approval Process Frequently Asked Questions
Trakehner stallions are not born "Approved"
The Trakehner horse has been bred for centuries as a riding horse and has been carefully selected for that purpose by a group of knowledgeable breeders appointed to that task; it has been used extensively to improve other European warmblood breeds.
Our stallions must be evaluated by a panel of experts before being certified as breeding stock.
They are judged on:
- Athletic Ability including movement at all three gaits as well as free jumping.
- Conformation as well as breed and gender type.
- General Impressions including manners and temperament.
This selection process helps us preserve the true Trakehner type and provides an objective evaluation of our stock, thus ensuring that we breed only the very best. Normally, only about 2 out of 100 colts are approved.
Make sure you know the difference between ATA-registered and ATA-approved! Breed to the chosen few.
Stallion Inspection Explained
The American Trakehner Association is committed to following the highly selective breeding standards practiced by the Trakehner Verband for more than 275 years, first in Trakehnen, East Prussia, and later in West Germany.
In keeping with this commitment, the ATA holds an annual Stallion Inspection where stallions of at least two years of age are presented to the Inspection Committee for breeding approval. The purpose of the evaluation is to assess objectively the individual stallion’s breed type, masculine characteristics, conformation, correctness, regularity, impulsion in all three paces, his jumping technique and temperament.
The Inspection Committee is composed of four voting members; three members are appointed from the ATA Inspection Committee, and the fourth is a representative of the German Trakehner Verband, either the Breed Director or his appointed delegate. The Trakehner Verband representative is empowered to cast two votes, with the other members of the commission each entitled to one vote. This measure is intended to give the ATA the best assistance in the selection of breeding stallions and the Trakehner Verband an opportunity to ensure that the breed is preserved and advanced according to the same breeding objectives worldwide.
What The Inspection Committee Is Looking For
I. TYPE
Trakehner Type:
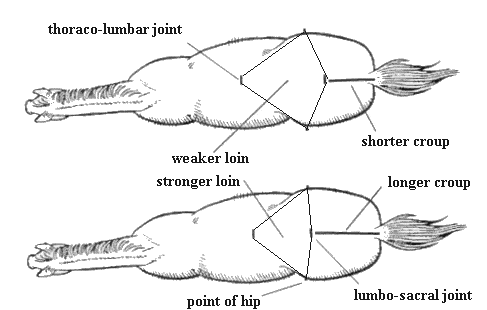
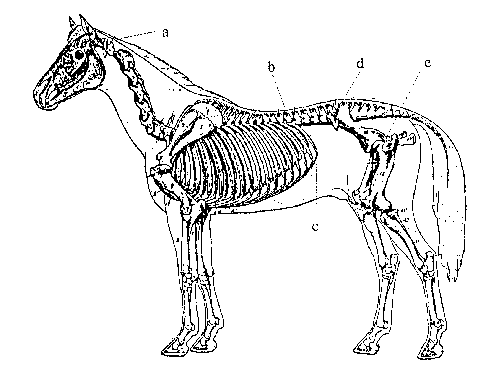
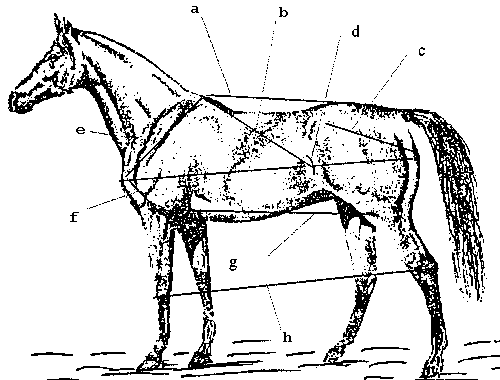
The Trakehner is a horse of beauty and harmony, possessing great endurance, mental and physical balance, and an excellent character. A small, expressive head with a broad forehead and large eyes is desirable. The neck should be set on properly and of significant length, the withers well defined, the shoulder long and sloping, and the back of medium length. The croup should be long, muscular and of oval shape. The ribcage should be deep and wide and connected to a substantial frame, representing a horizontal rectangle (in contrast to the square frame of the Thoroughbred). The joints should be large and well defined.
Stallion Type:
The stallion, as the embodiment of masculine power, should be correspondingly more significant in every way than the broodmare. It is necessary that he impart an impression of well defined masculine characteristics in his appearance, bearing, manners, and way of moving.
II. CONFORMATION
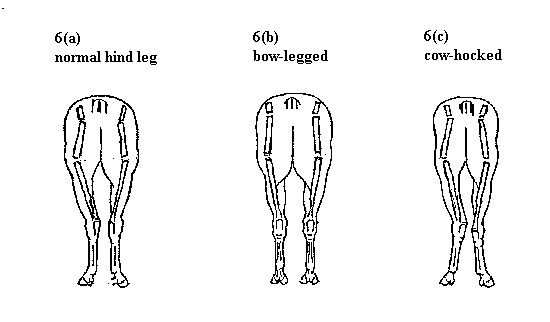
Correct conformation is a very important criterion in the selection of a breeding stallion. The head and neck should provide adequate balance for the rest of the body. The neck should be set on at a moderate angle, rising up from the chest and withers distinctly, and it should be straight or convex in its top line without being too upright. The body should show a balance of long sloping shoulder and equally long, sloping croup. The back should be of medium length and the withers evident. The top line should be smooth with no excess dipping of the back, the tail set moderate and the body deep and broad. The legs should be straight and firm, functionally correct, with moderate pastern angles. The cannon bones should be relatively short, and the legs must possess enough joint and bone size to be in proportion with the rest of the body. The hind leg should show enough angle in the joints to produce the desired spring and impulsion. The feet should be round, well balanced, and of adequate size for the animal.
III. REGULARITY OF GAITS
Ideally, the stallion should move straight, without winging or paddling, and without traveling too wide or too close, at all three gaits. The rhythm should be even, relaxed, and regular.
IV. IMPULSION
There should be freedom and spring in all the joints of the legs, with no dragging of the toes. The front legs should move freely and evenly from the shoulder, the back should be supple and elastic, and the hindquarters engaged, giving the necessary impulsion. To demonstrate impulsion over fences, candidates are required to free-jump.
V. GENERAL IMPRESSION
The overall impression should be one of freedom, harmony, balance and an alert but tractable temperament.
Evaluation Criteria
The minimum size requirements for a stallion at 2 1/2 years of age are 15.3 hands (160 cm) in height, with a heart girth of 72 inches (183 cm), and a cannon bone measurement of 7.5 inches (19 cm).
The young stallions are evaluated for breed type, presence, conformation, walk, trot, and canter, correctness and regularity of their paces, natural impulsion, jumping ability, and overall impression (where all individual factors are weighed against one another). The minimum score for registration into the OSB for Trakehner stallions will be 58 points, with a score less than 5 in any of the individual categories – regardless of the total score – constituting disapproval. The minimum score for Thoroughbred, Arabian and Anglo-Arabian stallion is 60 points with a score less than 5 in any of the individual categories constituting disapproval.
Evaluation Procedure
(Subject to change)
Part I:
- Verification of color and markings on registration certificate.
- Measurement of height at the withers, heart girth, and cannon bone.
Part II:
Presentation of horse in hand at the walk and trot on a hard surface, moving in a straight line away from and then toward the Inspection Committee. The stallion is required to stand before the committee with front, side and hind views.
Part III:
Presentation of horse in hand on a triangular track with level, cushioned footing. Shown at the walk and trot with the horse also being stood up in front of the Commission facing both right and left as well as showing front and hind views.
Part IV:
Presentation of horse free-jumping over a line of three fences. The free-jumping phase is optional for Trakehner stallions performing at Grand Prix level dressage, or Grand Prix level show jumping stallions or Advanced level eventing stallions.
Part V:
Presentation of horse at liberty. Shown at liberty on the flat at the trot and canter in both directions.
Part VI:
Under-Saddle Phase for 4 Year Old and Older Stallions*
Stallions that will be 4 years old or older in the year they are inspected will be required to perform an under-saddle demonstration at their inspection except:
- Grand Prix level dressage stallions will have free jumping and liberty phases optional for the owner, but not the under saddle phase.
- Grand Prix level show jumping stallions and Advanced level eventing stallions will have the free jumping phase optional for the owner but not the under saddle phase.
- Similar to the process in Germany for stallions of this age, the stallions will be ridden in a group with other stallions (if more than one) and will be expected to perform walk, trot and canter. Older stallions that have competed in upper levels of dressage (Prix St. Georges), jumping or eventing (Intermediate or higher) will perform alone in the arena.
- The under-saddle phase will be part of the overall impression score. The committee will observe the stallion’s willingness to work, tractability, temperament, and way of going under saddle. Horses and riders should be shown in dressage tack.
- Horses will be expected to perform the gaits in 20-meter circles including a change of direction with intersecting 20-meter circles as well as large figure-eights the length of the arena across the diagonal.
The stallion will perform an under saddle demonstration of walk, trot and canter as directed by one of the inspectors. The rider will be asked to perform with the horse on 20 meter circles, change of rein and show change of pace within the gaits and show lengthening at trot and canter.
Tack and apparel for the under saddle phase is as allowed by USEF and USDF for Recognized Dressage Competitions at the level the stallion is performing .
Part VII:
- Presentation of horse at the walk in a group.
- Conclusion and final decision of the Inspection Committee.
*Note: The under-saddle phase will not replace the performance requirements for any Trakehner stallion that is initially approved. To be fully approved, a stallion must complete the performance requirement.
ATA Free-Jumping Protocol
- All stallions presented for inspection will be required to participate in a Free Jumping Test except for stallions that have competed at Grand Prix dressage or only raced.
- It will be judged with a jumping score and will be taken into account in the final evaluation of the stallion for approval.
- A team of one supervisor and four assistants, carefully selected (to be arranged by hosts or owners) and suitably equipped with lungeing whips, will be in the ring. The supervisor will be in charge of the entire process.
- One stallion handler only, designated by the owner, will be permitted in the ring with the horse.
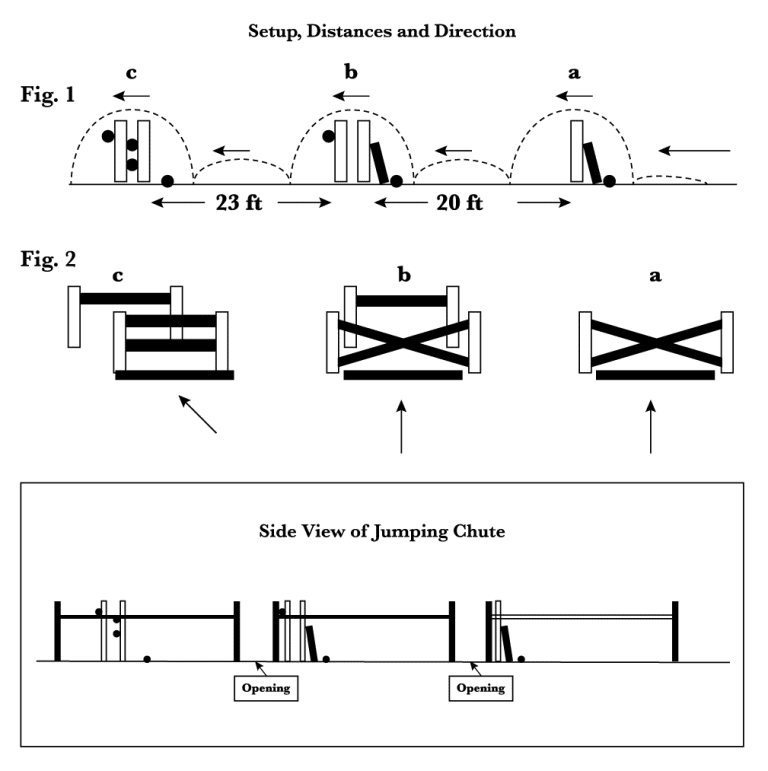
- The chute is to be constructed with side rails in such a way to have an opening of about 4 feet wide on one side directly behind the first two jumps to allow for the horse to enter for observation and to later station a person to encourage the horse over the jumps. To construct the chute and catch pen, 20 standards, 6 wings and 30 poles are needed for proper set up.
- The handler will first walk the stallion into the chute at the provided opening from the side to allow the horse to see and familiarize himself with the chute and obstacles.
- Unless otherwise directed by the Inspection Committee, each horse will be allowed three jumping runs through a triple combination jumping chute and contained by side rails the entire length of the chute.
- The 1st element will be crossed poles, with the ends in the standards at 30 inches of height, and a ground pole in front (Figs. 1a and 2a).
- The 2nd element, about 20 feet from the 1st element (measured from back of 1st element to front of the 2nd,) will be similar to the 1st, but with a horizontal rail, also at 30 inches of height immediately behind the crossed poles (Figs. 1b. and 2b).
- The 3rd element, approximately 23 feet from the 2nd, (measured from back of 2nd element to front of 3rd) will be an oxer (Figs. 1c and 2c), 33 inches high, with a spread of 24 inches, which will also have a ground pole in front. It will be raised to 39 and 45 inches for the second and third runs, and the spread increased accordingly. The front rail on the 3rd oxer will be placed about 6 inches lower than the back rail to allow ramping of the oxer.
- A catch pen will be constructed after the final jump to contain the horse after each run. This should be constructed with standards and poles and should be approximately 35-40 feet long and the width of the chute.
- For each run, the stallion will be trotted in hand up to the 1st element. A 36-inch length of plain nylon cord will be run through the near snaffle ring, from which the reins have been removed. One end of the cord will be released to allow the cord to slip out about 8 to 10 feet in front of the 1st element as the horse is sent down the jumping chute.
Diagrams
*NOTE: See Stallion Tab for Required Documents
Inspection entries received after the published deadline at the Annual Meeting will be charged an expedite fee of $100.
